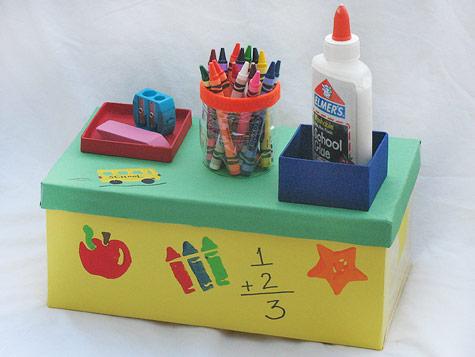
Desktop Organizer
Kids can make this adorable desktop organizer to hold all their supplies! Cubbies on top hold glue, erasers, pencil sharpeners, crayons, and whatever your little students are using at the time.
What you need
- Child size shoe box
- 3 sheets yellow construction paper
- 2 sheet green construction paper
- Acrylic paint (blue, red, green, brown, orange, yellow, black)
- 3” square box with lid
- Plastic water bottle (12-16 oz)
- School-themed foam stamps (school bus, apple, star, crayons)
- 1” x 7” strip of orange felt
- Paintbrush
- White craft glue
- Glue stick
- Clear tape
- Scissors
- Black marker
How to make it
- Check corners of shoe box and use tape to close any gaps, rips, or tears.
- Cover shoe box with yellow construction paper using a glue stick to attach to sides, and tape to close at ends and corners.
- Cover lid with green construction paper using glue stick and tape as in step 2.
- Paint the sides and inside of small box blue and the lid red. Set aside to dry.
- Cut bottom off of plastic bottle about 3” up. (NOTE: Get a parent to help–the edge of the bottle can be sharp.) Recycle remaining portion of bottle.
- Glue orange felt strip around the top of the opening of the plastic bottle. Felt should overlap on inside and outside of bottle opening to cover cut edges. Cut a piece of green construction paper in a circle to fit the bottom of the bottle and glue in place. Set aside to dry.
- Decorate the outside of the box with school-themed stamps. Paint each foam stamp and press firmly on to the construction paper. Lift directly up to remove. Let dry.
- Use school bus stamp to add a bus to the lid. Use white craft glue to attach the red lid, blue box and bottle bottom to the lid of your school supply box. Allow to dry completely.
- Use black marker to add a simple math equation to the side of the box. Use black marker to write “school” on the side of the bus. Dot on red paint for the tail light using the handle end of a paintbrush or a toothpick.
- When everything is dry, fill box with supplies. When you are using the supplies, fill the bottle with crayons, lids with glue, scissors, eraser, and pencil sharpener–whatever you need to have on hand.
Helpful Tips
- Use clear tape to secure any edges that won’t stick down with glue.
- Be careful not to overload the top of your box by piling too many items inside.
- If any of your organizers come loose, simply secure with glue.
This project was created by Amanda Formaro, originally for Kaboose/Spoonful.
