
Yarn Spider
Make this adorably creepy spider to hang from your ceiling and welcome your Halloween guests!
What You Need
- Black yarn
- Waxed paper
- Scissors
- White craft glue
- Paintbrush
- Toothpick
- Black paint
- 2 yellow wiggle eyes
- Instant grab glue
- Fishing line (optional)
How To Make It
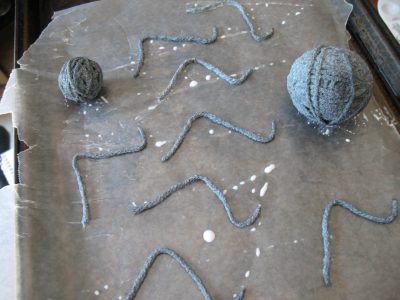
1. Cut 8 pieces of black yarn, four inches in length each. Line a baking sheet or sturdy cardboard with waxed paper.
2. Combine 2 tablespoons of white glue with one tablespoon of water and mix together. Place the 8 pieces of yarn into the bowl of glue mixture and move them around to be sure they are completely covered.
3. Remove yarn, one piece at a time, removing the excess glue mixture with your fingers. Do not squeeze, you want there to be glue, you just don’t want them dripping. Place each piece of yarn onto the waxed paper.
4. Bend each piece at a 90-degree angle to create the “knee.” At one end of each of the pieces of yarn, bend a short piece to create the foot. Set aside.
5. Wrap black yarn around one finger. Remove it from your finger and continue wrapping and turning to make a yarn ball. Keep wrapping until the yarn ball measures about 1-inch in diameter. Cover the yarn
ball in glue mixture and place it on the waxed paper with the legs; set aside.
6. Wrap black yarn around two fingers. Continue wrapping, as your did above, to make a larger yarn ball, about 2-inches in diameter.
7. Cover ball in glue mixture and place on waxed paper. Allow the glue to dry completely; this could take a few hours.
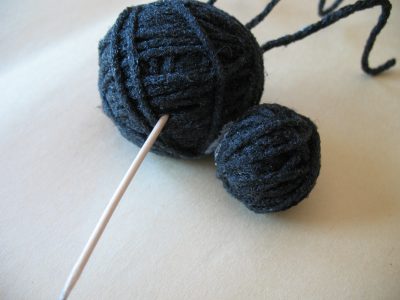
8. Remove the items from the waxed paper. Peel off any waxed paper that sticks to the yarn.
9. Glue the head (smaller yarn ball) to the body (larger yarn ball).
10. Use a toothpick to poke a hole in the side of the spider where you want a leg to go. Wiggle the toothpick around in a circular fashion then remove the toothpick. Add a bit of instant grab glue to the end of the leg and insert into the hole. Repeat for each leg.
11. To cover up any remnants of waxed paper, touch up spider with black paint.
12. Glue on wiggle eyes and if you want to suspend your spider from the ceiling, tie a piece of fishing line around him and secure with glue.
Helpful Hints
- Make your spider more colorful by adding spots or stripes made from felt.
- To add fangs, paint a toothpick white then cut in half and glue the fangs to the bottom of the head.
- To make your spider look friendlier for little ones, add a simple smile with a piece of skinny chenille.
This project was created by Amanda Formaro, originally for Kaboose/Spoonful.