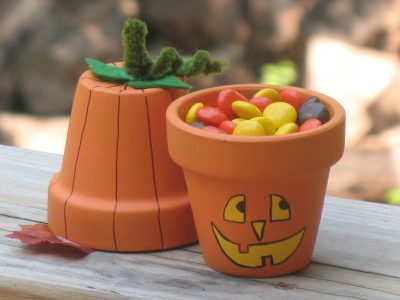
Pumpkin and Jack-O-Lantern Pots
These cute pots are great as a table decoration, or turned upside down they make fun treat holders. Provide the paint and markers at your Halloween or harvest party, and this makes a great project for your guests.
What You Need
- Small terra cotta pots
- Orange and yellow craft paint
- Sponge applicator
- Brown and black fine point markers
- Green chenille stem
- Toothpick
- Green felt
- Scissors
- Small silk leaves
- White craft glue
How To Make It
- Paint both terra cotta pots orange, inside and out, using a sponge applicator or paintbrush.
- For the Jack-o-Lantern pot, add a face and paint it yellow. When dry, outline the yellow facial features with black marker.
- For the pumpkin, use a brown marker to draw lines from the top to the bottom of the pot.
- Twist green chenille stem around the toothpick until toothpick is completely covered. Cut off remaining chenille. Remove chenille from toothpick and untwist half of it to give it a curly appearance.
- Fold the tightly twisted end in half, then wrap a little of the untwisted end around the folded ends to secure and hold it together.
- Cut out three leaves from green felt. Turn pot upside down and glue leaves to the bottom of the pot. Take the chenille and glue it to the center of the leaves, the folded end (stem) pointing upward with the untwisted end (vine) going off to the side.
- Glue a few silk leaves to the top rim of the pot (the bottom of your pumpkin).
Helpful Hints
- If you like, paint a rim around the top of the Jack-o-Lantern, or decorate the rim with felt or glitter glue.
- Fill candy pots with Halloween M&M’s, Reese’s pieces, or candy corn.
- Because of the color of the terra cotta pots, you can simply this craft by skipping the orange paint step altogether.
This project was created by Amanda Formaro, originally for Kaboose/Spoonful.