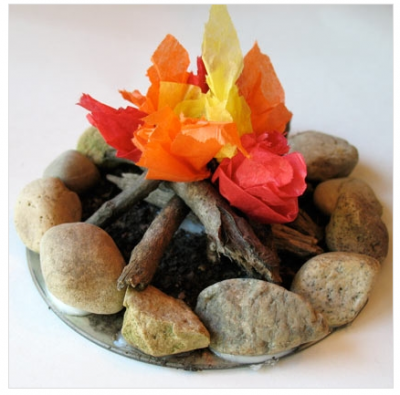
Recycle an old CD and make this fabulous miniature campfire! This is great fun for kids who love roasting marshmallows in the great outdoors.
CD Campfire
There are affiliate links in this post. That means if you buy something from that link, I will earn a small commission, but it won’t cost you anything additional.
What you’ll need:
- Old CD
- Rocks – about the size of a quarter
- Sticks
- A handful of soil, dirt or sand
- White craft glue
- Small scraps of red, orange and yellow tissue paper
- Toothpick
Helpful Tip:
- We do not recommend hot glue for this project. While the rocks will stick well, they can easily pop off later on. White glue will adhere much better so be sure and plan for an overnight dry time.
How to make it:
- Cover CD with glue and use a paintbrush or your finger to spread the glue out for an even coat.
- Cover glue area with dirt or sand and tap off excess.
- Use your finger to push back a little of the dirt from the edges, all the way around the CD, to make room for the rocks.
- Squeeze out a generous amount of white glue onto the cleared edge of the CD. Press a rock into the glue. Repeat until entire rim of the CD is covered in rocks.
- If necessary, break sticks into approximately 4 inch pieces. Using white craft clue, build a “fire” with the sticks by laying them down in a teepee formation, gluing as you go. Let everything dry for 2 hours (will not be completely dry, but won’t slide around).
- Tear tissue paper into small pieces, approximately 1″ or 2″ squares.
- Place tip of toothpick into the center (don’t poke through) of a piece of red tissue paper. Wrap the tissue paper around the toothpick.
- Dab some glue on the tip and dip it into the sticks, removing the toothpick once inserted. Repeat around the top of the sticks with several red pieces), and then add a few orange toward the middle, and lastly one or two yellow pieces at the top of the stick mound.
- Let project dry completely overnight.
This project was created by Amanda Formaro, originally for Kaboose/Spoonful.