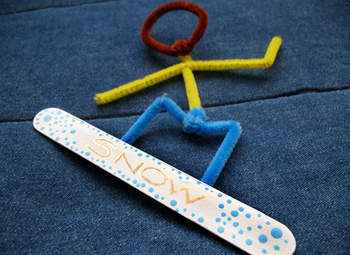
Snowboarding season is just about here! Kids will love testing their creativity while bending this chenille snowboarder into shape.

Chenille Snowboarder
What you’ll need (affiliate links):
- 1 jumbo craft stick
- White and light blue paint
- Paint brush
- Toothpick
- White craft glue
- Scissors
- Gold paint pen
- Snowboarder Pattern
How to make it:
- Paint jumbo craft stick white. Let dry. Use toothpick dipped in light blue paint to decorate craft stick. Set aside to dry.
- To make the chenille man, cut the yellow chenille stem in half. Cross the two pieces like a lower case letter “t” and twist together at the crossing point. Bend one arm up like it’s waving, and point the other one downward.
- Cut about 2 inches off of the blue chenille stem and set aside. Bend the remaining blue chenille stem in half to find the center. Starting at the center, bend each side up, then back down to form an upper case letter “M” to make the legs. Twist the bottom of the yellow body around the center of the leg section. Take 2″ piece of blue chenille and wrap it around the intersection you just created.
- Bend the brown chenille into a circle and twist it around the “neck” of the yellow chenille. Trim off the excess brown and wrap any remaining around the neck.
- Write the word “SNOW” across the snowboard with marker or paint pen.
- Lay the chenille man on the table and add some white glue to the feet then place the snowboard on top of the feet.
Tips:
- Chenille stems are sold by individual color and in large variety packs.
- Use construction paper to create a fun snow scene to which you can add your chenille snowboarder.
This project was created by Amanda Formaro, originally for Kaboose/Spoonful.